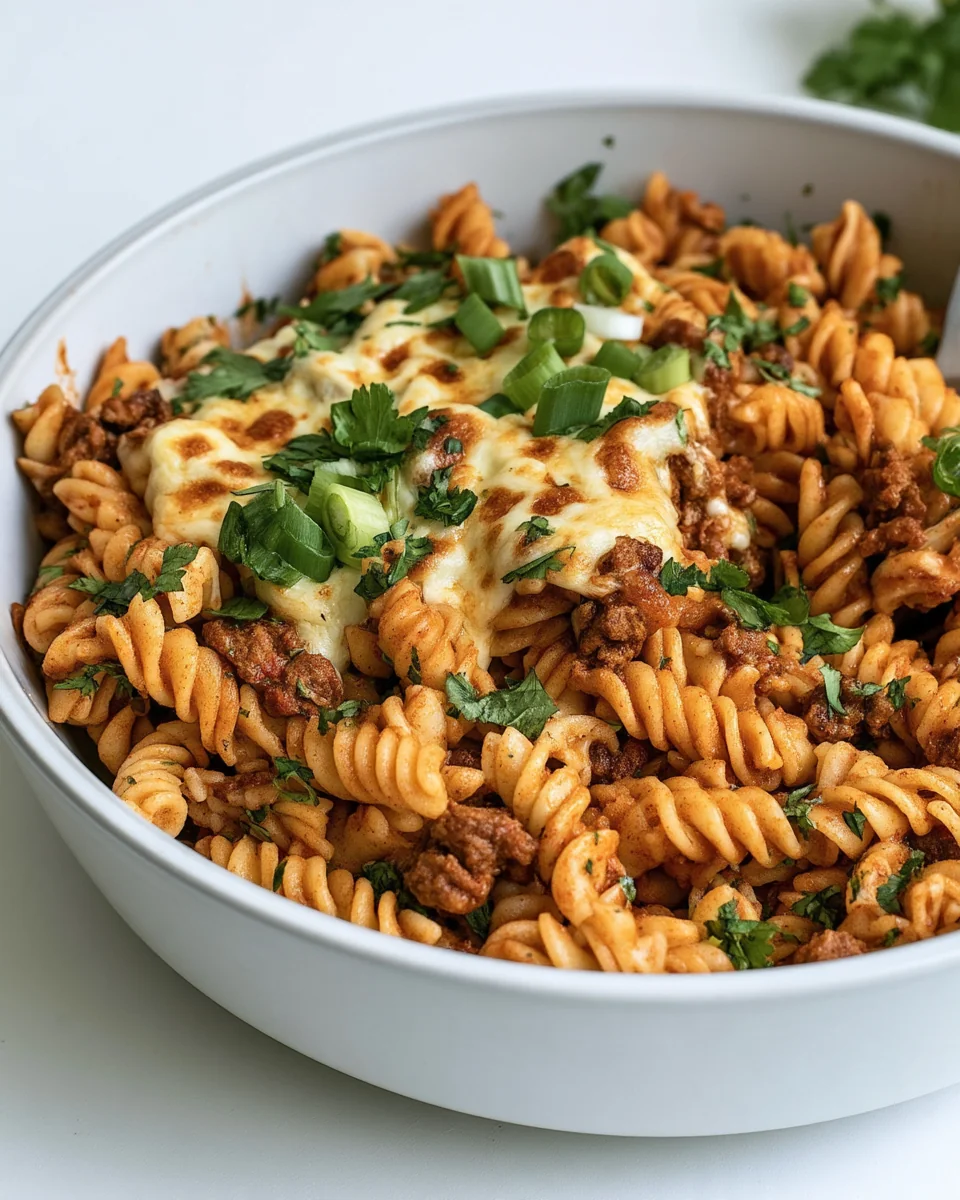
Enchilada Pasta is a satisfying one-pot dish that combines the richness of enchilada sauce with the comforting texture of pasta. Imagine a warm bowl filled with tender rotini, ground beef, and a melty cheese topping, all infused with the bold spices typical of Mexican cuisine. It’s the kind of dish perfect for family dinners or weeknight meals when you want something flavorful without too much fuss.
This recipe shines by cooking the pasta directly in the enchilada sauce and broth, allowing the noodles to soak up all the flavors. This avoids the common problem of mushy pasta, as the rotini absorbs just the right amount of liquid, resulting in perfectly cooked pasta with a cohesive, satisfying texture.
Why You'll Love This Recipe
- One pot, minimal cleanup — Everything cooks in a single skillet, reducing the number of dishes you have to wash.
- Flavor-packed pasta — The rotini absorbs all the spices and seasonings from the enchilada sauce and broth, making every bite delicious.
- Customizable toppings — Add toppings like diced tomatoes, olives, and fresh cilantro for a fresh finish that can cater to different tastes.
- Quick to prepare — The total cook time is just 15-20 minutes, so it’s ready when you are, even on a busy night.
- Hearty and filling — This meal combines protein from the beef and creaminess from the cheese, making it a satisfying option.
Ingredients & Substitutions
Serves 6
For the Pasta
- 1 tablespoon olive oil — adds richness; can substitute with vegetable oil.
- 1 cup yellow onion, diced — provides sweetness and depth; shallots can work too, though they are milder.
- 1 pound ground beef — gives a hearty texture; substitute with ground turkey for a leaner option, but reduce cooking time to avoid drying out.
- 3 teaspoons taco seasoning — infuses the dish with Mexican flavors; use a mix of cumin, chili, and garlic powders if you don’t have a pre-made blend.
- 20 ounces enchilada sauce — forms the base for flavor; use homemade for a fresher taste or any store-bought variety.
- 2 cups beef broth — enhances the flavor of the pasta; chicken broth works fine as a lighter alternative.
- 8 ounces dry rotini pasta — holds sauce well; you could substitute with other shapes like penne or fusilli, but check the cooking times.
- 1 1/2 cups Monterey Jack, Colby, or cheddar cheese — provides gooeyness; mozzarella can also substitute but lacks the same sharpness.
- 2 ounces cream cheese, cut into 1" cubes — adds creaminess; sour cream can work but will alter the texture a bit.
- 1 cup corn — adds sweetness and texture; use canned or thawed frozen corn; skip if you dislike it.
- Green onions, fresh diced tomatoes, black olives, sour cream, cilantro — for garnishing; these are optional but enhance presentation and flavor.
How to Make Enchilada Pasta
Step 1: Heat the Oil
Heat the olive oil in a large, deep skillet or Dutch oven over medium heat. You should see it shimmer slightly.
Step 2: Sauté the Onions
Add the diced onions to the skillet. Sauté for 2-3 minutes until they begin to soften and turn translucent — this builds a flavorful base for the dish.
Step 3: Cook the Beef
Add the ground beef. Break it apart with a spoon and cook for 5-6 minutes until it’s no longer pink. You’ll want to see some browning, which adds flavor; that’s a good sign!
Step 4: Add Taco Seasoning
Stir in the taco seasoning, ensuring it's evenly distributed. Cook for another minute until you can smell the spices — that’s the aroma you want!
Step 5: Combine the Sauces and Pasta
Pour in the enchilada sauce, beef broth, and dry rotini. Stir everything together and make sure the pasta is submerged in the liquid. Cover the skillet and bring it to a boil.
Step 6: Simmer
Reduce the heat to a simmer and cook for 15-20 minutes, stirring occasionally. The pasta should absorb most of the liquid and become tender. If it looks dry, add a little more broth — the goal is creamy, not dry!
Step 7: Mix in Add-ins
If using cream cheese, sour cream or corn, stir them in during the last 2 minutes of cooking time for a rich and creamy texture.
Step 8: Stir in the Cheese
Remove the skillet from heat and stir in the cheese until it's melted and gooey. You're looking for a rich, cohesive mass.
Step 9: Garnish and Serve
Garnish with green onions, diced tomatoes, olives, sour cream, or cilantro as desired. Serve warm, making sure to scoop up all the cheesy goodness!
How to Serve Enchilada Pasta
Serving Enchilada Pasta can elevate your meal experience, whether it’s a family dinner or a casual get-together. This dish is best enjoyed straight from the cooking pot, but how you present it can make a difference. Here are some ideas for serving, along with recommendations for what to pair with this hearty, cheesy dish.
Serving Ideas
- Serve warm: The pasta is best when served immediately after cooking while it's still hot, ensuring you get the meltiness of the cheese and the freshness of the ingredients. Allow it to sit off heat for no more than 5 minutes to cool slightly before plating.
- Use a shallow dish: A large, shallow serving platter helps keep the pasta from steaming itself, which ensures it won’t turn mushy. Using a 13x9 inch dish lets the bubbly top stand out.
- Garnish generously: Top each serving with fresh ingredients like diced tomatoes or green onions; this adds a colorful contrast and a fresh taste that balances the richness. Aim for at least one tablespoon of each garnish per serving.
- Perfect for casual get-togethers: This dish suits any laid-back occasion, from family game nights to potlucks. Serve each portion with a side of tortilla chips for some crunch that complements the creamy pasta.
What to Serve Alongside
- Black olives: Their brininess cuts through the richness of the cheese and beef.
- Sour cream: The cool creaminess provides a wonderful contrast to the warmth and spice of the pasta.
- Fresh cilantro: Its herbal notes lighten up the dish by adding brightness.
- Corn salad: A sweet corn salad offers freshness and a touch of acidity that balances the flavors.
- Guacamole: Creamy avocado adds smooth texture that complements the hearty pasta.
- Lime wedges: A squeeze of lime juice adds a zesty brightness, enhancing the overall flavor.
 Pin it
Tips for the Best Enchilada Pasta
The key to a successful Enchilada Pasta lies in how you manage the cooking process and assembly. Here are some crucial tips to keep in mind:
- Use lean ground beef: Aim for 80/20 lean-to-fat ratio to avoid excess grease that can make the pasta soggy.
- Monitor the pasta texture: Stir the pasta occasionally while cooking. It should be tender yet firm; if you notice it softening too much before the cooking time ends (15-20 minutes), reduce the heat slightly to avoid mushiness.
- Incorporate cream cheese last: Add the cream cheese in the last 2 minutes and let it melt fully for a creamy consistency without curdling. This ensures a smooth blend instead of clumps.
- Check the liquid absorption: Once finished, there should be minimal liquid left. If it looks too runny after 20 minutes, simmer for an extra 2-3 minutes while stirring to thicken it up.
- Store leftovers properly: For best results, refrigerate leftovers in an airtight container. Enjoy them within 3 days to maintain flavor and texture; consider reheating in a skillet for an even better result.
- Adjust the cooking liquid: If you want a saucier dish, increase the broth to 2 1/2 cups. This can help the pasta cook through while absorbing more flavor from the enchilada sauce.
- Avoid overcooking the onions: When sautéing the onions, cook until they are just translucent, about 2-3 minutes. This prevents a burnt taste in the final dish and preserves their sweetness.
How to Store Enchilada Pasta
Store leftovers in an airtight container in the refrigerator for up to 3 days. This ensures the dish stays fresh and safe to eat. The pasta's texture may change if it's frozen, so plan accordingly if you want to keep it longer.
Refrigerator
- Use an airtight container.
- Best consumed within 3 days to maintain flavor and texture.
- If it has an off smell or noticeable changes in texture, discard it.
Freezing Enchilada Pasta
- Transfer to a freezer-safe container or resealable bag, leaving some space for expansion.
- It can be frozen for 1-2 months.
- If the pasta becomes overly mushy upon reheating or develops freezer burn, it's time to toss it.
Reheating Enchilada Pasta
To enjoy leftovers, reheat in a large skillet over medium-low heat for about 5-7 minutes. Stir occasionally until heated through, ensuring you don’t dry it out. You may add a splash of water or broth to help regain moisture.
Frequently Asked Questions
Here are some common questions about Enchilada Pasta that many cooks may have.
Can I make Enchilada Pasta ahead of time?
Yes, you can prepare the dish ahead of time. Cook it, allow it to cool, and then store it in the refrigerator for up to 3 days. When ready to eat, simply reheat as directed.
Why did my Enchilada Pasta turn out dense?
If your Enchilada Pasta is dense, it’s likely due to overcooking the pasta or using too much liquid. Monitor the cooking time and ensure the pasta is just tender and has absorbed most of the sauce.
Can I halve the Enchilada Pasta recipe?
Absolutely, you can halve the recipe. Just divide all ingredients in half and use a smaller skillet or pot to accommodate. The cooking time should remain the same, but check for doneness a couple of minutes earlier.
Does Enchilada Pasta freeze well?
Yes, Enchilada Pasta does freeze well for 1-2 months. However, expect some change in texture when you reheat it. To maintain quality, use an airtight container.
What pan can I use instead of a Dutch oven?
If you don’t have a Dutch oven, a large, deep skillet can also work well for Enchilada Pasta. Just ensure it's large enough to hold all ingredients without spilling.
Final Thoughts
Enchilada Pasta is a versatile one-pot meal that's easy to prepare, making it ideal for busy weeknights or gatherings. It’s packed with flavor, combining the heartiness of pasta with the zest of enchilada sauce. Feel free to customize it by adding your favorite vegetables or proteins to suit your taste. Give it a try, and enjoy a comforting dinner with minimal cleanup!